cookieOptions = {...}; My Galaxy SIII How To: tutorial
Showing posts with label tutorial. Show all posts

Sunday, July 15, 2012

How to Connect Samsung Galaxy S3 to MAC PC using Android File Transfer

Some users of Samsung Galaxy S3 struggling to connect their devices to a PC running with MAC OSX. Using the Android File Transfer on Windows computer seems no issues but when it comes to Mac computers and Macbook pro laptops seems there is a problem with the connection.

Connecting Samsung Galaxy S3 to MAC PC using Android File Transfer issues:

So I got my SGS3 yesterday and noticed that the Android File Transfer app won't work, which used to work well when I owned a Galaxy Nexus. I tried it on 2 different Macs and it won't work on neither. The app does not recognize the phone being connected. When I connected it on windows (bootcamp, same Mac) it was recognized, so it's not a hardware fail, it's a software bug.

My Q is, has anybody successfully managed to use the Android File Transfer app together with a Galaxy S3.
Thx, all the help greatly appreciated.
It's definitely something with my Mac. I connected to my virtual Win7 machine on my Mac and it freaks out with the installing new software pop-up over and over but never connects.
Now it's gonna drive me crazy till I figure out what's going on with my Mac!

Hey guys, i'm having an issue with the file transfer. I can see both internal memory and SD, but when i tried to drag and drop from Finder it is giving me an error, saying my screen is locked (even when it isn't) and asking me to reconnect. anyone else have this problem? for now i'm transferring using File Explorer but its a pain in the ass. thanks!

I had this problem when I just got my Galaxy S3 at the end of May, and switching the connection mode to camera (ptp) did the trick. Now, however, regardless of the connection type I have chosen or whether or not I have enabled debugging, I cannot use AFT. At no point does it recognize my device, it just keeps telling me "No Android device found. Please connect your Android device with a USB cable to get started." I have reinstalled the program and still no luck.
MTP never worked for me on my Macbook, while PTP worked as a workaround until LFB (and later). With LFB changing to PTP (by default) pops up Image Capture, which, if everything worked as it should, is what you'd expect I suppose. The problem is that Image Capture doesn't find any pictures on the device even though it recognises that an I9300 is connected - and Android File Manager now doesn't work in either MTP or PTP mode.


Connecting Samsung Galaxy S3 to MAC PC using Android File Transfer Solution:
On your phone, when connected to the AFP program on your mac, you'll see a USB symbol in the notification area. Pull it down and you'll see it says something like 'Connected as media device' and it'll give you options underneath that to change it. Select that and you'll get to a settings page which will allow you to set your phone as a media device ((MTP) or as a camera (PTP) - do the latter and it should work fine.
I have to say, I love this phone but am not overly enamoured with the mac syncing aspect of it. Most apps in the store are flaky at best or don't work at all, TBH. Using the above method, I've managed to get my media over to the phone by dragging/dropping from iTunes and iPhoto.

Problem is, I still can't find a way for my computer to - reliably - see my phone as a camera when I plug it in e.g. invisible to iPhoto and Image capture.

I did actually. Turns out you have to check Camera (PTP) mode instead of Media device (MTP) mode.
Once I connected and checked PTP, the Android File Transfer now sees my phone
You don't need to be in debug mode either.

source: http://forum.xda-developers.com/showthread.php?t=1682041

Install UMS (USB Mass Storage) apps
Here's another solution if you're Samsung galaxy S3 can't connect to your Mac computer. This is an apps called UMS (USB Mass Storage) which enables your Samsung Galaxy S3 external microSD card  accessible as a USB mass storage device.

http://forum.xda-developers.com/showthread.php?t=1711009 

If you find a way around any other solution to this problem, please let us know.

How to Connect Samsung Galaxy S3 to smartTV using MHL to HDMI adapter

If you already bought a Samsung Galaxy S3 MHL to HDMI Adapter and want to connect your phone to a smartTV or any LED TV and LCD TV sets with HDMI input options you can do it as simple steps ahead.

The Samsung Galaxy S3 MHL to HDMI Adapter cable connects to the MicroUSB connection on the bottom of the Samsung Galaxy S3 and provides a HDMI port into which you can connect an HDMI cable which in turn connects to a HDMI TV screen. So, you can watch a film stored on the Galaxy S3,browse your photos or play it through your flat widescreen TV and keep the phone charged at the same time.

The Samsung Galaxy S3 comes with large internal memory or can even upgraded up to 64GB external SD card. So you can load more photos, videos, music on your Galaxy S3. This options lets stream your photos, watch movies (iTunes, NetFlix), videos, MTV, Podcast, on your HDTV via your Samsung Galaxy S3.

The Samsung Galaxy S3 HDMI adapter is portable and easy to use. This MHL to HDMI Adapter is one of the must have Samsung Galaxy S3 Accessories, So that you can turn your Galaxy S3 in a full-featured home entertainment and presentation system when coupled with an HDTV.

Here's the MHL to HDMI Adapter connection guide from Samsung Galaxy S3 and TV:
1. Connect your MHL Adapter on your Samsung Galaxy S3 micro USB port.
2. Connect the HDTV using the HDMI cable to the MHL Adapter
3. Connect the MHL Adapter external power supply (5V, 500mA), this is needed so that the Adapter will work and convert the MHL to HDMI signal from your Samsung Galaxy S3 to HDTV.


Once you connect the MHL Adapter you simply need to set your TV to HDMI input options and then also restart your Samsung Galaxy S3 after connecting your MHL adapter to TV.

Saturday, July 7, 2012

How to format a 32GB/64GB Micro SDHC/SDXC card on Samsung Galaxy S3

If you have just bought a new MicroSd card on your Samsung Galaxy S3 you need to format it first before you can continue to use the card to store files such as apps, music, videos and anything on it.

When you ordered a Samsung Galaxy S3 its already have a preloaded 32gb class 10 additional microSd card, an external memory on the phone. Some users prepared additional space so that they can store more files since Samsung Galaxy S3 is upgradeable up to 64gb extenal microSD memory card.

So, it needs to be formatted first when you put it into your Galaxy S3 before you can store anything to it, just make sure that you have purchased a compatible card that exactly works on Samsung Galaxy S3.
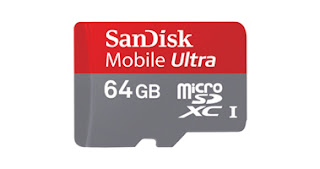
When my newly purchased 64gb micro SDXC card - mine is Sandisk Mobile Ultra, I first formatted it to exFAT file system. A  64GB micro SDXC cards works basically on every Android device that can read up to that capacity but they generally only work when formatted to Fat32 rather than the SDXC standards native exFAT formatting system (several devices on ICS work with them formatted NTFS now also, but as a general rule Fat32 is the only option). The problem here is that when you use of these cards Fat32 formatted you impose a 4GB file size limit on them, which can be hassle for transferring HD video to your device, and even worse you curtail the stellar read and write speeds available in the SDXC standard. I for one can't wait to format my 64GB card to exFAT for unrestricted use in my S III.

You can grab the SDXC formatter with exFAT support at https://www.sdcard.org/downloads/formatter_3/

This guide shows how to format the microSD card once you firstly mount the external sdcard on your Samsung Galaxy S3 phone's memory card tray.

1. Press the 'Home Menu'.

2. Choose 'Settings'.

3. Scroll down to the bottom> Tap 'Storage'.

4. scroll down to the bottom> Tap 'SD card'

5. Tap 'Mount SD card'

6. Tap 'Format SD card'

7. You'll be then prompted with a message
Data cannot be recoverred after SD card is cleared. Continue?

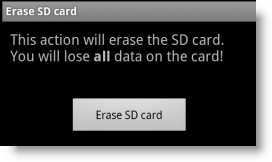
8. Just Tap 'Format SD Card' button

9. Finally Tap on 'Erase SD Card' button to start the erase process.


10. That's it!

You will then see a total available space of your newly formatted SD card. You can now add or store more files as you want on your Samsung Galaxy S3 externalSD card.

Update:  Prior to the new firmware releases by Samsung, this process will no longer works.. Please read martin phillips posts below instead.
It would appear that the recent firmware upgrade withdrew support for the exFAT file system. Reading around, lots of people have reported problems with exFAT on the S3 (see the http://forum.xda-developers.com wesite). It was from this site that I got the solution....

FAT32 is the way to go (yeah it's got a 4Gb individual file limit, but I'd rather have 64Gb of storage than a 'dead' card). As I reported above, the Windows 7 command line tool will not format a 64Gb card to FAT32. The solution from the xda site above is to use this tool: http://www.ridgecrop.demon.co.uk/index.htm?guiformat.html
(click on the screenshot to download, not the 'Download' link)

All I have to do now is put all my data back on the card!!!

Monday, June 25, 2012

How to Update Samsung Galaxy S3 Software using Kies

 If you want to enjoy more out of your Samsung Galaxy S3, you need to keep it updated to its latest software updates on Kies. Samsung Kies is a tool from Samsung that lets your mobile phone get any latest sotware available software upgrades that will add  enhancements like extra speed, improved functionality and fixed for any bug issues.

To update your Galaxy S III thru Kies you only need to download it from Samsung Kies.

Kies 2.0

You must ensure these things first before you may upgrade to avoid failure issues.
  • Make sure galaxy S3 battery is fully charge.
  • Ensure that you have a good internet connection
  • Kies will run on computer with Mac and Windows OS
  • Use the supplied USB date cable with the Galaxy S3


Step 1: 
Once, you already downloaded Kies, Install and run it in your computer
Step 2:
The connect your mobile phone to your PC using USB cable
Step 3:
Just follow the onscreen instruction on Kies window. Kies will guide you through the installation process
That's It! You can now update your Samsung Galaxy S3 to any latest software updates available from Kies.

source: Samsung UK

Saturday, June 23, 2012

How to Insert New SIM Card on Samsung Galaxy S3

Okay you got a new Samsung galaxy S3 in hand, so where to start? Mostly first timer will insert a new SIM card to the phone. If it is your first time to open up your Samsung Galaxy S3 and wonder how to insert a micro SIM card unto it, here's how simply to do it.

You need a micro SIM card to start with,  the phone shop will provide you I working SIM card but then you can also switch it over to another mobile network provider if your Galaxy S3 is unlock or unbranded version.

1. You may firstly removed the back cover by gently hold at the top and bottom edges and slit it upward.

2.  If the battery if already inserted to it, just simply remove it by lifting at the top left.


3. Now, when the battery is removed, slit the Micro SIM into the SIM tray facing to the correct direction.

4. Put back the battery once the SIM card is already installed.

5. Then gently replace back the back cover by smoothly applying pressure along the edges

That's it! you have now your Samsung Galaxy S3 inserted with a new SIM card.

You may also visit Vodafone UK youtube channel for the video guide.


Thursday, June 21, 2012

How to Add New Contact on Samsung Galaxy S3

Here's step by step guide on how exactly do you add a new contact on to your Samsung Galaxy S3 smartphone.You can add contacts on your Samsung Galaxy S3 as many as you want. This option is to add an individual contact manually, without syncing the phone from your online contacts.

So here's how to do it:

1. From the Home Screen tap on Menu.
add contact on Samsung Galaxy s3 step1

2. Select the Contact icon option.
add contact on Samsung Galaxy s3 step2

3. Tap on the '+ symbol' from the top of the screen.
add contact on Samsung Galaxy s3 step3

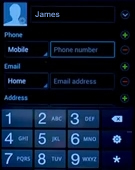
4. From here, you can enter the name, phone number, email address and also a photo of your new contact.
add contact on Samsung Galaxy s3 step4

add contact on Samsung Galaxy s3 step5

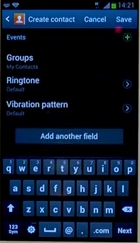
5. You can also add more other options like assigning a ringtone to that specific contact  by scrolling down at bottom of the Menu.
add contact on Samsung Galaxy s3 step6

6. Once your done adding a new contact, just simply tap on the 'Save' button.
add contact on Samsung Galaxy s3 step7

7. Now you can start making a call to that newly added contact by simply - tap the green phone symbol.
add contact on Samsung Galaxy s3 step8

That's it! You can add more contacts on the same procedure above many as you can on your Samsung Galaxy S3 phone.

Wednesday, June 20, 2012

How To Set a Music Track as a Caller and Alarm Ringtone on Samsung Galaxy S3

In this guide we'll show you a step by step instruction on how to use and set your music track as a ringtone on  your Samsung Galaxy S3. If you found it setting up your own desired or favorite music is much cooler than those pre-installed ringtone from the phone, this simple twist will personalized your ringtone and enjoyed more of your Galaxy S3 phone.

First Tap on Applications Menu.
Step 1: setting up music track as a ringtone on Samsung Galaxy S3

Scroll to the right so that you will be taken to the second application screen.
Then tap on Music Player
Step 2: setting up music track as a ringtone on Samsung Galaxy S3

Make a music selection from the album or track of your best choice that you want to set as a ringtone.
Step 3: setting up music track as a ringtone on Samsung Galaxy S3
Once you already choose your music selection,. Touch the Menu button.
Step 4: setting up music track as a ringtone on Samsung Galaxy S3

Touch Set as a Phone Ringtone, or for individual contact or for Alarm tone.
Step 5: setting up music track as a ringtone on Samsung Galaxy S3Step 6: setting up music track as a ringtone on Samsung Galaxy S3
That's it! you've set a music track as a ringtone on your Galaxy S3 phone.

Tuesday, June 19, 2012

How to Change Samsung Galaxy S3 Default Ringtone

Here's a step by step guide how to change the ringtone on Samsung Galaxy S III. I changed the ringtone of the phone when i was bored from the default one. If  it happens that you ain't like the default ringtone of your Samsung Galaxy S III and you want to change it, here's a simple steps on how you can change yours too.

First, go to your Phone Settings
To quickly access settings, swipe down from the top of the screen.

Change ringtone of Samsung galaxy S3 step 1: Swipe down Settings
Then Tap the settings icon
Change ringtone of Samsung Galaxy S3 step 2: Select Setting icon
Next, Select Sound
Change ringtone of Samsung Galaxy S3 step 3: Select Sound Option
Then Select Phone Ringtone
Change ringtone of Samsung Galaxy S3 step 4: Select Phone Ringtone Option
Tap on the ringtone selection to listen its previews
Change ringtone of Samsung Galaxy S3 step 5: Select Phone Ringtone Selection of choice
When your happy with your ringtone selection just Tap OK button
Change ringtone of Samsung Galaxy S3 step 4: Select OK Button to install new ringtone

That's it! you have now change the Ringtone of your Samsung Galaxy S III